
How To Download The Image From The URL Using Uipath

If you’re trying to download an image from a URL, but you’re not sure how to do it, this guide is for you! In this article, we’ll show you how to use Uipath to download the image from the URL without interacting with the URL.for that in Uipath we are going to use API Automation. let’s see how can we achieve that step by step
Below one is the input data sample of the Input data file.i have all the data in an excel file as below, in imgeurl column we have the URL of the image that we have to download as a jpg.


How to Install the Uipath Packages
the first step is that we need to install the Uipath WebAPI Activities Package.
- Go to Uipath Studio
- Click on Manage Packages
- Click on Official
- select the required package(UiPath.WebAPI.Activities) then the UiPath.WebAPI.Activities wizard will open
- Click On UiPath.WebAPI.Activities and click on install the package see the below image

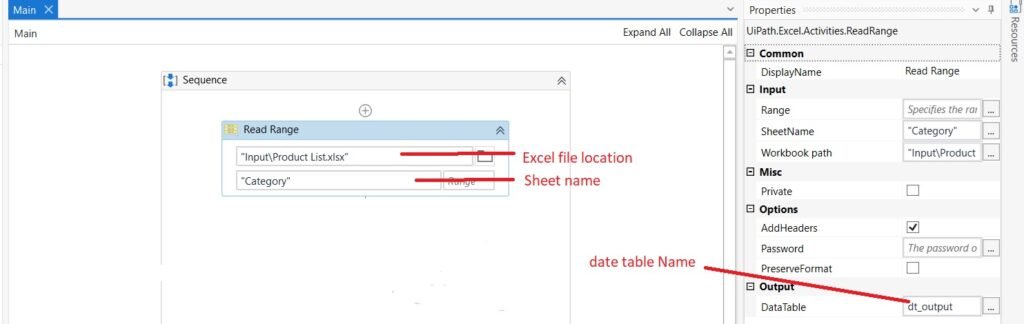
read the Excel file
now we have read the input excel file. drag and drop the Read Range (here I am using workbook activity) from the activities panel. Give the input file location where the excel file is saved and give the sheet name which sheet we want to read. and in the properties panel save the output data table as use shortcut ctrl+K to create the variable give the name for example dt_output
For Each Row in Data Table
now we have to loop each row and get the URL and file name and id. drag and drop the For Each Row in Data Table Activity from the activity panel. give the input data table that we have saved our data table as a dt_output
Tip: if you want to learn more about For Each Row in Data Table click here

Create the variables as a string from the variable panel like below filename, ImageUrl,folderpath

now in for each row in the data table the, assign the values to variables, drag and drop the assign activity from the control panel. left side give the variable and the right side give the value as CurrentRow(“Imageurl”).ToString.Trim

Assign the file name,on which name we have to save the images, leftside the give the variable filename and in value give the CurrentRow(“Name”).ToString.Trim+CurrentRow(“id”).ToString.Trim
ex: it will save the images as, pickels1

Saving the images
we created the variables, now the final step is saving the images.
take the HTTP Request Activity from the activity panel and check the properties
- in the Properties panel, check the request method Type is GET
- request URL – pass the imageUrl variable that we created
- in the bottom of the image there we have a resources path where we need to give the location where we need to save the images. give the file path and file name with the extension example: folderpath+ filename+”.png”
- Give the extension type in the end, if you want to save in jpg, give .jpg, or required in png format give .png

it’s done now run the bot and check it.
Full Workflow

Final Output
I have given the same image URL for testing purposes,